
Finally, the long awaited Android Oreo 8.0 Build (B20) update for ZTE Axon 7 A2017U has been official released by ZTE, and now available to all users via an SD Card Update Package.
“Please note that this is not an OTA (Over-The-Air) update and will not auto install. You will have to update your device manually via the Micro SD Card Package. Due to this major OS update from ZTE’s (MiFavor) to ZTE’s (Stock+) Android build, all data will be lost. Please back up all important information along with pictures and videos.”
The major changes introduced include: Daydream will not be supported with the Oreo update and MiFavor Toolkit removed and a host of others.
It is recommend that once the update is complete that you set up your device as a ‘’new device’’ and not restore backup from a previous build of Nougat.
Prerequisites for updating to Oreo
- Backup all important data (contacts, messages, photos, etc)
- Get an SD card with at least 2.5GB of free storage space
- Enable developer settings and USB debugging by following the instructions below:
- Go to your Settings and scroll down to About Phone.
- Tap on the Build number seven times until the dialog box says you are now a developer.
- Go back to the Settings menu and you should find a new option called Developer options. Click into the Developer options.
- Make sure that the developer options are turned on and that USB debugging is checked on.
- Make sure Enable OEM unlock is checked.
Updating ZTE Axon 7 A2017U to Android 8.0 Oreo
Step One: Download the file below and copy to the root of your SD card (that is, /sdcard/…)
File Name: A2017UV2.1.0B20_SD.zip
Size: 2.28 GB
Link: Download
Step Two: Before proceeding to the next step, please make sure to delete your Google account from the phone. In order to do that go to Settings->Accounts->select Google, and from the menu (top right corner of the screen), select the “Remove Account” option.
Step Three: Insert the SD card into your phone and power off the phone. When the phone is completely powered down, simultaneously press and hold the “Power” and “Volume Up” buttons. Keep holding until you see a menu with Recovery mode option. Your screen should look like this:
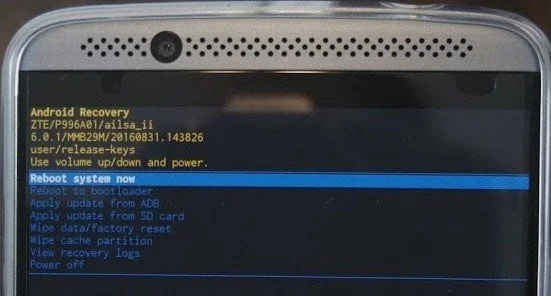
Step Four: Using the “Volume Down” button, navigate to the option “Apply update from SD card”. When this option is highlighted, press the “Power” button once. Select the previously downloaded A2017UV2.1.0B20_SD.zip file and press “Power” button again.
Step Five: The update to Android Oreo should now commence. But if your phone’s kill switch is activated, you would get an error message when you choose the“Apply update from SD card”. In this case you should go back to step two to remove your Google Account.
Step Six: Wait patiently for the update to complete and do not interrupt. Once complete, it should indicate that install from SD card is complete. You will now prompted with a screen to reboot device, select the option and wait patiently for the device to boot completely.
Your Axon 7 will restart and bring you back to the original boot sequence for Android Oreo to set up your phone.
Congratulations, all is done!
Credits: zteusa community

official KDZ firmware")
