Screenshots are quite useful. One can use them to demonstrate how to use an app or a feature on your smartphone, tablet, or computer. Among the many other uses of screenshots, you can use them to send a snapshot of an unusual error message to a repair professional so as to get immediate remote assistance on an issue you might have on your computer. This article explains different methods to capture screenshots on your PC.

Windows 10 introduced the Snip & Sketch screenshot tool, but Windows 11 largely relies on the Snipping Tool. There are other alternative methods for taking screenshots, so we’ll take a look at some of the most basic.
PRESSIING THE PRINTSCREEN KEY ON YOUR KEYBOARD
When you’re in a hurry, you may capture a screenshot of your full screen by holding the Windows button and the PrintScreen (mostly labelled Prt Sc, PrtScr, or PrtScrn) key at the same time. Every snapshot will be stored as a PNG file in your Screenshots folder. In File Explorer, look for the Screenshots folder; if you don’t see it, check in Pictures folder.
By hitting the PrintScreen key alone, you may be able to snap a screenshot of your full screen. The image will be transferred to your clipboard, and you can paste it into a document or email once it’s there.
However, depending on the type of keyboard you have on your computer or your Windows installation, you might have to press the Function (labelled “fn”) key + PrintScreen (Prt Sc) key to capture screenshots. This is mostly the case in Ubuntu (Linux Distro) installations.
SNIPPING TOOL
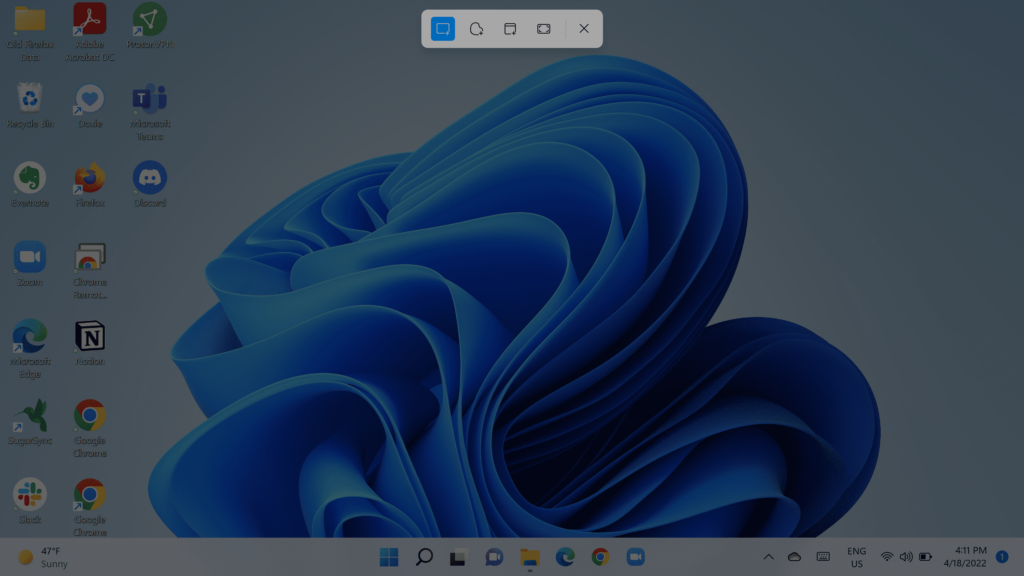
You may utilize the Snipping Tool that comes with Windows 11 if you want something a little more precise, such as taking a screenshot of a specific window or section of the screen.

Press Shift + Windows Key + S to open the toolbar. A set of icons will appear across the top of your screen. There are four options available to you:
- A rectangular snip: which is created by left-clicking and dragging your cursor until the area you want to snip is visible.
- Freeform snip: created in the same way as the first.
- For a single window, a window snip
- A clip that includes the entire screen
After you’ve finished taking your screenshot, a thumbnail of it will show in the bottom left corner for a few seconds; click it to bring it into the Snipping Tool app for editing, such as adding markings, writing, or cropping. If it fades before you can click on it, check the Pictures > Screenshots folder to find your screenshot. You may also share the image or save it as a PNG, JPG, or GIF file using the app.
Read also: Windows 11 Successfully Installed On Microsoft Surface Duo
Another way to find and launch the Snipping Tool is by searching for it using the search icon in the main toolbar. You also have the option to adjust some of the app’s settings by clicking the three dots in the top right corner of the app and choosing Settings. In the settings pane, there’s an option to delay screenshots by a few seconds, up to 10 seconds.


